


A price computing scale is one of the most straightforward instruments in retail — but only if it is set up correctly from the start. A scale that is not level produces inconsistent readings. A scale that has not been zeroed before the first transaction carries a ghost weight into every reading. A scale whose PLUs have not been programmed requires manual price entry on every transaction — slow, error-prone, and unnecessarily labor-intensive.
None of these problems is complicated to avoid. This guide walks through every step of setting up and using a price computing scale — from unpacking to the end of the business day — in the order that those steps must happen.
Table of Contents
Before You Begin: Confirm Legal-for-Trade Status
Before the scale is used in any transaction where a customer pays based on the weight it displays, confirm two things.
First, confirm the scale carries a Certificate of Conformance number on its data plate — the CC number that confirms NTEP certification. Without it, the scale cannot be used in a legal-for-trade application, regardless of how accurately it weighs.
Second, confirm the scale has been inspected and sealed by your state or county Weights and Measures office. Purchasing an NTEP-certified scale is not sufficient for legal-for-trade use. The individual unit must be inspected in place and sealed before its first commercial transaction.
For a complete explanation of these requirements and the penalties for non-compliance, see our article on what is an NTEP scale and when do you legally need one.
Step 1 — Choose the Right Location and Surface
Place the scale on a firm, stable, level surface — a fixed counter or a heavy-duty table that does not flex under normal working loads. Avoid surfaces that vibrate from nearby machinery, foot traffic, or HVAC airflow. Avoid surfaces exposed to direct sunlight, which affects the scale’s internal temperature and display visibility over time.
For outdoor applications — farmers’ markets, produce stands — place the scale on the most stable surface available at the booth. A dedicated small weighing table separate from the main display table eliminates vibration from neighboring activity. Position the scale behind a booth panel or your body to block prevailing wind, which causes the display to fluctuate at fine readability levels.
Adequate clearance around the platform matters. The customer must be able to see both the operator-facing and customer-facing display clearly. The product must be placed on the platform without obstruction. The operator must be able to reach the keypad comfortably without leaning over the product.
Step 2 — Level the Scale
Every price computing scale includes adjustable leveling feet — typically four threaded feet under the scale base — and a bubble level indicator on the top surface of the scale body.
Turn each leveling foot clockwise to raise that corner, or counterclockwise to lower it. Adjust all four feet until the bubble in the level indicator sits centered in the circle. A scale that is out of level produces readings that vary depending on where the product is placed on the platform — a systematic error that is impossible to detect in normal operation without checking the level first.
Check the bubble level at every setup location. A scale that is level on a fixed deli counter may not be level on a different market table. Recheck level whenever the scale is moved to a new surface.
Step 3 — Power On and Allow Warm-Up
Connect to AC power or confirm the battery is adequately charged before turning the scale on. A scale operating on a nearly depleted battery may produce reading instability before the low-battery indicator activates.
Press the power switch. The scale performs a brief self-test — the display cycles through all segments and then settles to show the software version, followed by a zero reading on the weight display.
Allow a warm-up period before the first transaction. As the CAS PR-II manual specifies, for maximum performance, allow the scale to warm up for 30 minutes before use after plugging in. The load cell — the precision sensor inside the scale — changes its electrical characteristics slightly as it reaches stable operating temperature. Readings taken immediately after power-on may be slightly less stable than readings taken after a 15–30 minute warm-up period, particularly in environments with large temperature differences between the overnight temperature and the operating temperature.
For high-volume operations where the scale runs all day, this is a non-issue — the scale is powered on well before the first customer arrives. For intermittent use or outdoor markets where the scale is powered on at the booth, allow at least 10–15 minutes of warm-up before weighing the first transaction.
Step 4 — Confirm Zero
Before any transaction, the weight display must show zero with nothing on the platform. If the display shows any non-zero weight with the platform empty, press the Zero key.
The Zero key resets the displayed weight to zero. Most price computing scales allow zeroing within a ±2% range of the full capacity — small amounts of residue, moisture, or platform debris that accumulated between uses can be zeroed out. If the display shows a weight outside this range and cannot be zeroed, remove everything from the platform, check for debris or a foreign object underneath the platform, and try again.
The Zero key and the Tare key are different functions. Zero resets the gross weight display to zero, clearing any offset that has accumulated. Tare subtracts the weight of a container placed on the platform, allowing the display to show net product weight only. Both are important — but they serve different purposes and should not be confused.
Step 5 — Program PLU Memory
PLU — Price Look-Up — is the stored product memory that lets the operator recall a product name and price per pound with a single key press rather than re-entering the price for each transaction. Programming PLU memory before opening is the setup step that most directly affects transaction speed and accuracy throughout the day.
The programming procedure varies by model. The general process on most price computing scales follows this pattern:
Enter programming mode. On most models, press and hold the PLU key, or press a specific key combination specified in the user manual, to enter PLU setup mode.
Select the PLU number. Enter the PLU number you want to assign — for example, PLU 1 for your first product.
Enter the unit price. Use the numeric keypad to enter the price per pound. For example, enter 3 9 9 for $3.99 per pound.
Confirm and save. Press the Tare or Enter key to save the PLU entry. Most scales emit two short beeps to confirm that the data has been stored.
Repeat for each product. Move through each product in your range, assigning a PLU number and price per pound. Keep a written record of which PLU number corresponds to which product — particularly important for scales with indirect PLU recall, where the operator enters the PLU number rather than pressing a dedicated key.
As Adam Equipment — a global scale manufacturer — explains in their PLU programming guide, PLU functions allow you to easily set prices to recall and switch between product prices with ease, saving time and making for a better customer experience. A farmers market stand selling strawberries at $3.99 per pound, blueberries at $2.99 per pound, and potatoes at $1.49 per pound stores all three as PLUs and recalls each with a single key press.
Update PLUs when prices change. Overwriting a PLU with a new price uses the same procedure as programming it initially — enter the PLU number, enter the new unit price, and save. The new price overwrites the previous value immediately.

Step 6 — Set Tare for Recurring Containers
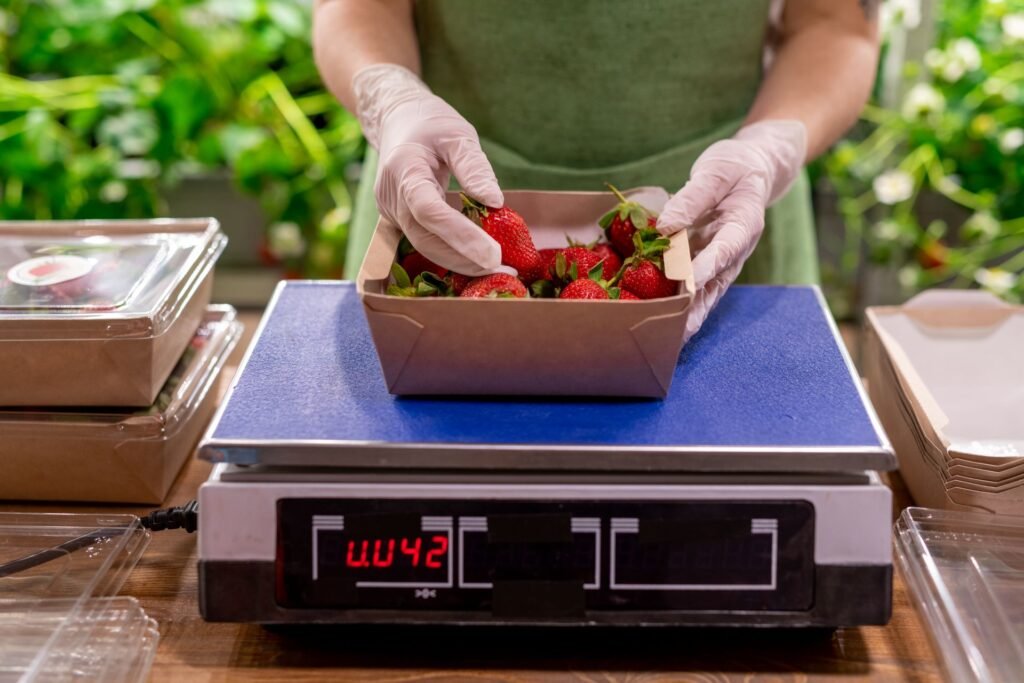
If you use the same container type for every transaction — the same deli bag, the same foam tray, the same paper wrapper — storing the tare weight as part of each PLU eliminates the need to manually tare the scale on every transaction.
Manual tare (per transaction): Place the empty container on the platform. Press the Tare key. The display returns to zero. Add the product. The weight shown is net product weight only.
PLU tare (stored): Enter the container weight as a tare value stored within the PLU entry. When that PLU is recalled, the scale automatically applies the stored tare before the product is placed on the platform.
Keyboard tare (entered manually): Enter the known container weight numerically using the keypad, then press the Tare key. Useful when different container sizes are used for different products.
For any transaction where the product is placed in a container before weighing, net weight is a legal requirement. As confirmed by state Weights and Measures regulations, all sales must be conducted by net weight — the weight of the product only, excluding the container. The tare function is not optional. It is how net weight is achieved on every transaction.
Step 7 — Conduct a Test Weighing
Before the first customer transaction of the day, place a known test weight on the platform and confirm the display reading matches the test weight’s certified value.
A 1 lb or 2 lb Class F NIST-traceable test weight is adequate for this daily verification. Place it on the platform. The display should read within the scale’s rated accuracy — for a Class III retail scale, within ±0.01 lb of the test weight’s certified value.
If the reading is outside this tolerance, do not use the scale for commercial transactions. Contact a certified scale technician for recalibration.
As Rice Lake Weighing Systems — a major US scale manufacturer — notes, NTEP-certified retail scales feature a low-battery annunciator to signal when recharging is needed. Check this indicator as part of the daily verification routine. A low battery warning before the first transaction is far better than a mid-shift power failure.
Step 8 — Conduct a Transaction
With the scale leveled, zeroed, PLUs programmed, tare values set, and a test weight verification completed, the scale is ready for commercial use.
Standard transaction — manual price entry:
- Confirm the weight display reads zero with the platform empty. If not, press Zero.
- If using a container, place it on the platform and press Tare. The display returns to zero.
- Place the product on the platform. Wait for the display to stabilize — the stability indicator or the cessation of display fluctuation confirms a stable reading.
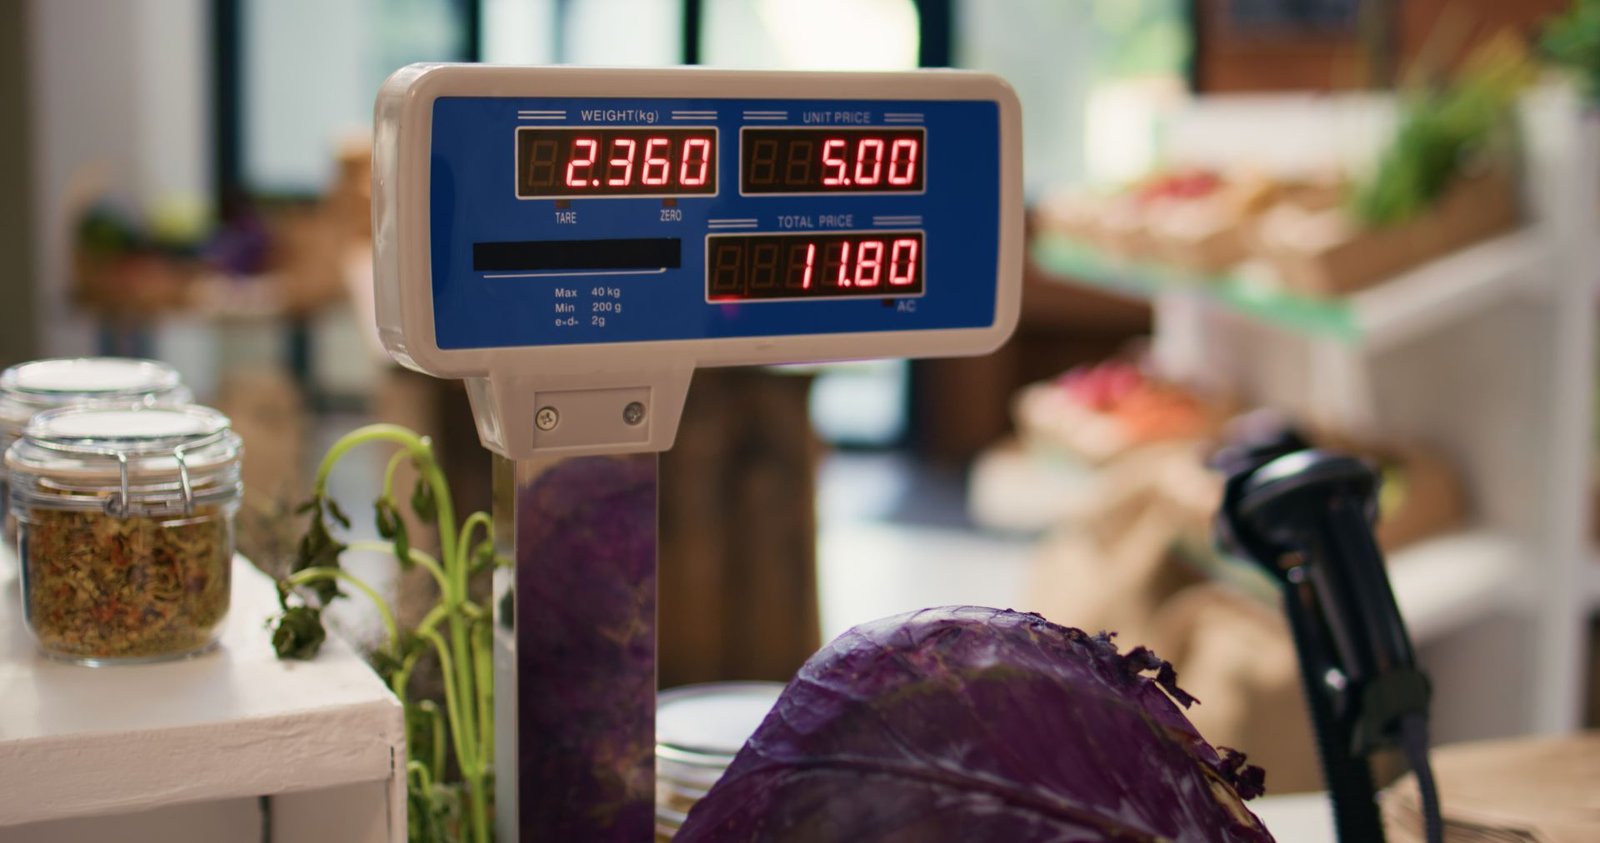
- Enter the unit price per pound using the numeric keypad. For example, press 4 9 9 for $4.99 per pound.
- The total price display shows the result automatically — weight multiplied by unit price.
- Read the total price to the customer or show them the customer-facing display.
- Remove the product from the platform. The display returns to zero, ready for the next transaction.
Standard transaction — PLU recall:
- Confirm zero. Tare the container if applicable.
- Recall the PLU for the product — press the direct PLU key, or enter the PLU number and press the PLU recall key.
- The unit price stored for that PLU appears automatically in the unit price display.
- Place the product on the platform. The total price is calculated immediately.
- Read the total to the customer. Remove the product.
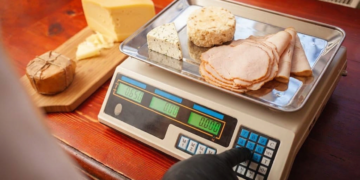
Repetitive transactions — Save mode:
When weighing multiple portions of the same product at the same price — pre-packing deli trays, portioning candy by weight — most scales offer a Save or Pre-Pack mode. This mode retains the unit price and tare weight across transactions, so the operator places the product, reads the price, removes it, and the scale resets to zero, ready for the next portion without re-entering the price.
As the Detecto DM15 operation manual explains, the Save function retains the unit price and tare for repetitive price computing of commodities with the same unit price. This is the correct mode for any batch pre-packing workflow where dozens of identical portions are weighed in sequence.
Step 9 — Handle Common Error Conditions
Over-capacity: The display shows an over-capacity error or alarm if the weight on the platform exceeds the scale’s rated maximum. Remove the product immediately. Do not attempt to force a reading on an overloaded scale — sustained overloading damages the load cell permanently.
Unstable reading: If the weight display fluctuates and does not stabilize, check for vibration from the surface, air movement across the platform, and whether the product is resting fully on the platform without touching anything else. For outdoor use, shield the scale from wind and confirm the surface is not flexing.
Cannot zero: If pressing the Zero key does not return the display to zero, remove everything from the platform and check for debris. If the display still does not zero, the scale may be outside its zero-capture range and requires service.
Low battery: Recharge immediately. Continue operating on AC power if available. Do not use a nearly depleted battery for commercial transactions — battery voltage instability affects load cell readings at fine increments.
Step 10 — End-of-Day Procedures
Clean the platform. Remove the platform — on scales with removable platforms — and clean underneath it. Wipe all food-contact surfaces with an appropriate food-safe sanitizer. Dry thoroughly before reinstalling the platform. Do not submerge the scale body in water. Do not spray cleaning solution directly onto the keypad or display.
Recharge the battery. Connect to AC power after every market day or shift. A fully charged battery before the next use day is the only reliable way to ensure full battery life through the next shift.
Zero the display before powering off. Remove everything from the platform and confirm the display reads zero before shutting down. This confirms the scale finished the session in a clean state and is ready for the next startup.
Check for physical damage. Inspect the platform, leveling feet, keypad, and display before storing or at the end of each shift. Any physical damage to the platform or base — particularly dents or deformation near the load cell mounting points — requires service before the next commercial use.
Record the test weight result. Keep a simple daily log of the test weight verification reading — the test weight’s certified value and the scale’s displayed reading. This record demonstrates due diligence in accuracy monitoring and is useful documentation if a Weights and Measures inspector asks about the scale’s maintenance history.
FAQs
How do I program prices into a price computing scale?
Enter PLU programming mode — typically by pressing and holding the PLU key or a specific key combination in the user manual. Enter the PLU number, enter the price per pound using the numeric keypad, and press the Tare or Enter key to save. The scale confirms storage with two short beeps on most models. Repeat for each product. Keep a written record of which PLU number corresponds to which product.
What is the difference between the Zero key and the Tare key?
The Zero key resets the gross weight display to zero when the platform is empty — clearing any accumulated offset or residue weight. The Tare key subtracts the weight of a container currently on the platform, allowing the display to show net product weight only. Zero is used before each session and any time the empty platform does not read zero. Tare is used at the start of every transaction where a product is placed in a bag, tray, or other container.
How long should I warm up a price computing scale before use?
Most scale manufacturers recommend 15–30 minutes of warm-up time after powering on, particularly in environments with a significant temperature difference between overnight and operating conditions. For scales used outdoors or brought in from cold storage, warm-up time is especially important. A scale that has run continuously through a shift has already reached stable operating temperature.
How do I know if my price computing scale is reading accurately?
Place a known NIST-traceable test weight on the platform at the start of each day. The displayed reading should be within the scale’s rated accuracy — typically ±0.01 lb for a 30 lb Class III scale. Keep a daily log of test weight verification readings. If the reading falls outside tolerance, cease commercial use and contact a certified scale technician.
Can I use the same price computing scale for different products at different prices?
Yes — this is exactly what PLU memory is designed for. Store each product at its own PLU number with its own price per pound. Switch between products by recalling the appropriate PLU. Scales with direct PLU keys allow single-key recall. Scales with indirect PLU memory require entering the PLU number on the numeric keypad. A well-programmed PLU setup eliminates manual price entry for every standard product in your range.
Conclusion
A price computing scale set up correctly takes three minutes at the start of the day. It levels on a stable surface, zeros cleanly, has its PLUs programmed with current prices, and passes a test weight verification before the first customer arrives.
A scale set up incorrectly — not leveled, not zeroed, PLUs out of date — introduces errors into every transaction that follows. Those errors do not announce themselves. They appear in the prices customers are charged, in the weights on the receipt, and in the Weights and Measures inspection report if an inspector visits during the day.
The setup steps in this guide take less time to complete than they do to read. For a complete explanation of what a price computing scale is and how it works mechanically, see our article on what is a price computing scale and how does it work. For guidance on choosing the right model for your application, see our article on how to choose a retail scale for your business.


